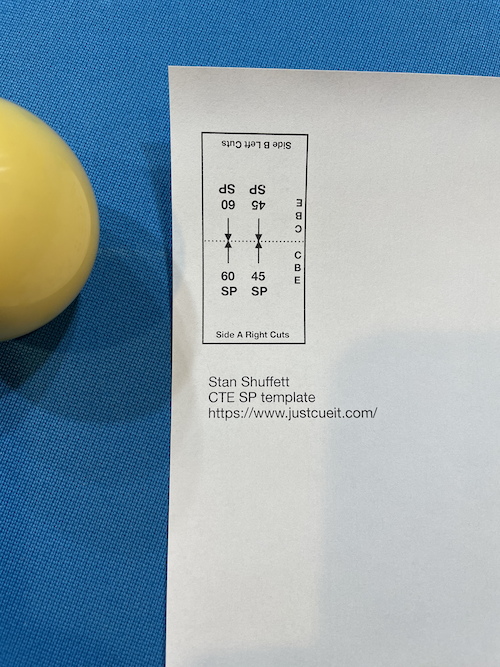
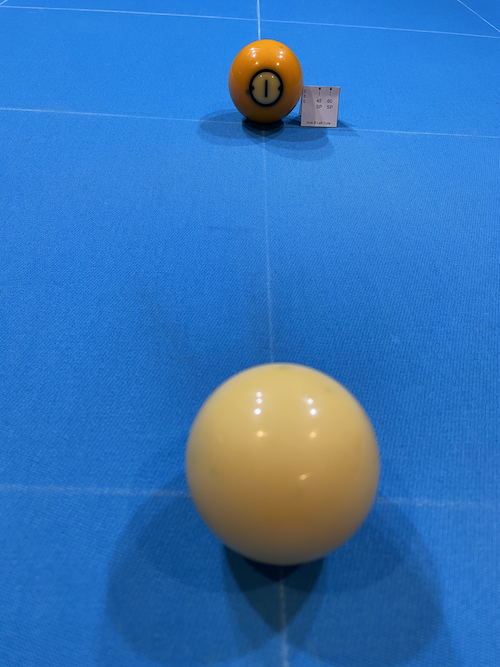
You can download this table tent for the 45SP and 60SP for CTE here. Be sure you print at 100% scale. You can check with a ruler that the 45SP is exactly 1/2 inch from CBE side.
Enjoy!
You can download this table tent for the 45SP and 60SP for CTE here. Be sure you print at 100% scale. You can check with a ruler that the 45SP is exactly 1/2 inch from CBE side.
Enjoy!
I’d like to bring a discussion to the nuts and bolts. Stan finally unraveled the description that brings everything together. The system steps are now 100% clear and concise. I’d like to highlight the two main pieces that are new additions to the terminology. This is all described in the Truth Series videos, and in much greater detail in the book. But this is IMHO, the icing on the cake.
Angled face: All along this has been here but in different terms. “Poke your head out.” “Don’t put your nose directly behind the cueball”. Now we have it: the angled face. That is, face turned slightly left or right from the SL. And what comes along with it, the definitive description for left and right cuts. Your left eye is dominant one one line (either SL or AL) and your right eye is dominant on the other. This brings your mid-face position onto what is known as the “parallax” line, or the line midway between SL and AL. The only way this can be done properly is by angling your face slightly toward the cutting side of the cueball. That means for left cuts, your face angles toward the left, your eyes look right. Your left eye is dominant on the AL, your right eye dominant on the SL. Your mid-face position is on the parallax line. For right cuts everything is opposite. There is no guesswork for the above, there is only one place your eyes can be for this perception to be correct for all three lines from ball address. All the gritty details are in the book on “gearing” the CB/OB to this perception.
The new book “Center Pocket Music” by Stan Shuffett, it can be found at his website https://www.justcueit.com/
Then comes stepping the cueball. There has often been confusion around the pivots. It usually described that pivots, when executed correctly, resolve the shot line. And they do, once you sort out how to execute them perfectly. But there were often questions around it. Where to put the bridge hand perfect every time? How to pivot perfect every time? Now there is a concrete description: the stepped cueball. The system has always worked the same: the pivots aid in taking you to a shot line that you can already see. But it was never really described that way, it was always through the pivots. Or, “The eyes lead, body follows.” Going back to that parallax view: there are two CB centers: one on the left half of the cueball and one on the right half. Two eyes, two centers. A left pivot guides you to the left one, and right pivot guides you to the right one. The centers are there, you can technically already see them, the pivots just help you focus onto the correct one. Now we have a solution that is 100% visual: stepping the cueball. You can find the left or right CCB by simply switching your eye focus (no head movement) to the left or right edge of the cueball. When you do that, the corresponding CCB jumps out at you. This is the NISL (non-imaginary shot line). From there it is a matter of placing your cue (and your bridge V) along that line.
Again, there is no guesswork here. The NISL is definitive. Putting all the pieces together, there isn’t any room for “feel” in regards to the system. Of course you must deliver a straight stroke on the NISL. If you are adding speed or spin, all those factors come into play. CTE isn’t a magic bullet for shot execution, but it does take you to the NISL without guesswork. Without “feel”, have you.
This is a post I made at azb, I’ll link it here.
https://forums.azbilliards.com/showthread.php?p=4191899
Many pool playing systems, namely aiming systems, use different segments of a ball for alignments such as edges, centers and quarters. The edges are pretty easy to obtain, as is the center. The quarters however, are not quite as obvious. Most systems assume that “eye-balling” the quarter is going to be precise enough, and with practice you can learn to “just see it”. But, is there a mathematical way to know the true quarter? Yes there is.
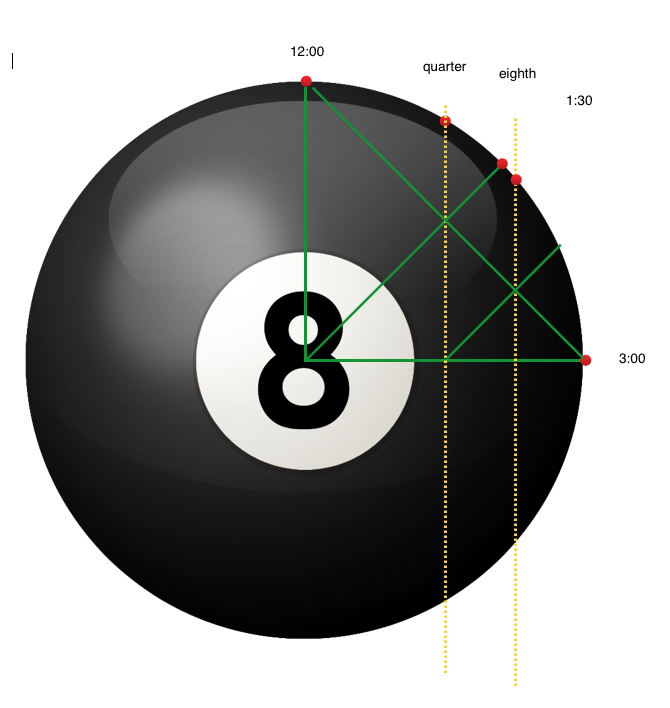
Lets look at the right quarter. When you look at the face of a ball, the 12:00 and 3:00 lines are very easy to visualize: straight up and straight right. The line that is exactly between those is 1:30. Again, very easy to visualize. Now if you imagine a line connecting 12:00 and 3:00 (forming a triangle), it bisects the quarter ball segment. Likewise, this line bisects the 1/8th ball segment, as you can see below.
Although you can use the exact bisecting lines to find the quarters, I like to just look at the perimeter of the ball. If you look at the red dot at the 1:30 mark, you can see how far up the quarter mark red dot is, and also how far down the 1/8th mark red dot is. I memorize these distances, which only takes a handful of shots to get the hang of. Either method works, it is personal preference which one you like.
It is also useful to know that on a modern stripe ball, the stripe edge is 1/16th of an inch outside the true quarter. Old centennial stripe balls are exactly on the quarter.
It has been a while since I made a post. Two young kids, busy work, life happens. I’ll try to do better 🙂 Meanwhile, Stan Shuffett continues to refine and discover new things about CTE, and I’m pretty excited to see what he has in store for his book coming out! Today, I’m going to talk a little bit about the pivot in CTE.
Over the years there has been a lot of controversy about the pivot. Especially from those that have not taken the time to understand CTE from an experienced point-of-view. Those that do know and understand CTE, they don’t worry about the pivot. They know that if they follow the prescribed steps, they get the result they are after. This is not good enough for those on the other side of the fence, and I don’t blame them! I was there once myself.
A post, I believe from Colin Colenso, once described and explained how a fixed pivot on the bridge hand could not possibly work. He diagrammed how a slightly bad placement of the pivot (say a millimeter or two) would throw the trajectory off at the object ball by a considerable margin. The idea that the bridge hand is always placed with such precision sounded preposterous. I think I agree with that sentiment. I know the how, but not exactly the why. So, I took upon the task of paying attention to the pivot while shooting various shots. The result was quite simple, really. The answer to the pivot is the following.
The pivot does not drive the result of the center ball alignment. Instead, the pivot takes you to the alignment that your perception has already given you. Think about that for a moment. Lets say I’m using a CTE perception, I’ve aligned the aim points and I’m down on the shot in the 1/2 tip offset position. I am ready to pivot at this point. Now, my eyes move their attention to the cue ball. I’m focusing on center ball. Looking from this offset, there is only ONE place the cue can go such that it is pointed directly through the core of the cue ball. I simply turn my cue so it is exactly on that line.
My bridge hand is a soft squishy thing (as Dave Segal stated), it is not a precision instrument. But, it is not crucial to be precise. I only need it in a proximity so that I can turn my cue onto the CCB perception I’m looking at. Through experience I have trained myself to always place my bridge hand very close to that proximity, which to be honest is nearly identical for shots longer than a diamond. We know that for the shorter shots the bridge needs to be closer. Well, a close inspection when on the 1/2 tip offset will indeed show you the line through the cue ball core is a steeper one. I recall during a lesson with Stan watching him pivot the cue on a shorter shot. The butt of the cue was moving considerably more than the longer shots, and that makes complete sense.
So to summarize, the pivot is not a mechanical rotation on the bridge hand. Instead, the pivot takes us to the center cue ball perception such that the cue points directly through the core of the object ball. If the cue needs to shift on the bridge hand slightly, that is not a problem. Even if I purposely placed my bridge hand at an unusual distance, I found myself sliding my bridge hand back during the pivot so the alignment worked.
Stan has always said that CTE is a visual system. When you find your perception alignment standing up (at ball address as Stan puts it), you then look at center cue ball, see where the cue needs to go, then move your body however necessary to put the cue there. The eyes lead, the body follows. The pivot is not all that different. You look through the core of the cue ball from the 1/2 tip offset when you are pre-pivot (full stance), and you simply put your cue on that line. If the bridge hand is placed accordingly, all it takes is a slight pivot to get there. The eyes lead. Your eyes are the most deadly accurate tool in pool, and CTE uses them to the fullest extent.
A common question that comes up regarding CTE aiming: is feel (conscious adjustment) involved? This can be problematic, as there are multiple contexts to this question. So first lets back up and talk about aiming in general. Continue reading
Here is a short video of me shooting (manual) CTE PRO ONE with blind pockets. By far the biggest trouble I had was determining the aim lines and pivot to use. This got easier pretty quickly. The execution itself is all the same.
You can see here I made an incorrect pivot on the first bank and caught that, then stood up and tried again. Using manual pivots it should be clear that I slide in, pivot, make zero adjustments and just stroke the shot in.
When shooting a very short safety shot, it can be helpful to use your jump cue for the shot.
Shooting with your opposite hand may feel extremely clumsy, and you might think it would take too much effort to become proficient with it. Actually, our brain is pretty capable of switching things over. All your opposite hand needs is a little muscle memory.
Try practicing by running one full rack once a day with the opposite hand. Within just a few days it will feel far more comfortable than when you started. This is a must-have in your arsenal when you come across a shot requiring a bridge, but would be a cinch with the opposite hand.
Stan recently posted a video regarding sweep support. One part of the video covers footwork for CTE PRO ONE, and I think this is hugely beneficial information. Here is what I learned from it. Continue reading